Unlock the Secret to Perfect Stiff Peak Marshmallow Frosting
Step aside, buttercream! While beloved for its versatility, there's a world of frosting artistry waiting to be explored, and at its pinnacle sits the magnificent marshmallow frosting. Imagine a dessert topping that is impossibly glossy, wonderfully fluffy, and boasts a dramatic flair that transforms any cake or cupcake into a showstopper. This isn't just any sweet spread; we're talking about a homemade marshmallow frosting recipe that delivers impressive height and a cloud-like texture, making it a truly unforgettable experience.
Often likened to gourmet marshmallow fluff, this frosting is surprisingly straightforward to create, requiring just a few staple ingredients and a solid understanding of the technique to achieve those coveted stiff peaks. If you're ready to elevate your baking repertoire with a topping that's as easy as it is eye-catching, read on to discover the secrets behind making the perfect stiff peak marshmallow frosting.
What is Stiff Peak Marshmallow Frosting? A Swiss Meringue Masterclass
At its heart, perfect stiff peak marshmallow frosting is a type of Swiss meringue. Unlike its French cousin, where egg whites are whipped cold, the Swiss method involves gently cooking egg whites with sugar and a stabilizer over a double boiler. This crucial initial step serves multiple purposes: it dissolves the sugar completely, ensuring a smooth, grain-free texture; it gently warms and slightly cooks the egg whites, making them safer to consume; and it prepares the proteins for maximum volume and stability during the whipping phase.
Once warmed, the mixture is transferred to a stand mixer and whipped vigorously until it transforms into a voluminous, shiny, and incredibly stable meringue that can hold its shape in dramatic, gravity-defying peaks. This dual-stage process is what gives Swiss meringue-based marshmallow frosting its superior structure, glossy finish, and light-as-air consistency, distinguishing it from denser frostings. It's less sweet than many buttercreams, allowing the pure marshmallowy flavor to shine through, and its stability makes it ideal for piping intricate designs or creating impressive swoops with a spatula.
Essential Ingredients for Fluffy Perfection
Creating the ultimate marshmallow frosting starts with selecting the right ingredients and understanding their role. While the list is short, each component plays a vital part in achieving that desired stiff peak perfection.
*
Egg Whites (8 large eggs): These are the backbone of your meringue, providing the structure and volume. For best results when separating, crack cold eggs as their yolks are firmer and less likely to break, preventing any contamination of the whites (which can inhibit whipping). While the mixture will be heated, ensuring no yolk bits get into your whites is paramount for successful whipping.
*
Granulated Sugar: For that signature pure white, glossy finish and perfect sweetness, granulated sugar is your go-to. It dissolves beautifully during the heating process, eliminating any grittiness. While superfine sugar can dissolve quicker, standard granulated sugar works perfectly. Using brown sugar, by contrast, would create a different, caramel-hued topping known as sea foam frosting.
*
Cream of Tartar: This often-overlooked ingredient is a true meringue superhero. A natural byproduct of winemaking, a small touch of cream of tartar acts as a stabilizer, helping the egg white proteins denature and set properly. This allows the meringue to whip up to its fullest potential, achieve greater volume, and hold those stiff peaks without collapsing, making your marshmallow frosting impressively sturdy.
*
Pure Vanilla Extract (2 tablespoons): This is where the quintessential "marshmallowy" flavor comes from. Invest in the best quality pure vanilla extract you can find, as it truly makes a difference in the final taste profile. Avoid imitation vanilla for this recipe, as its flavor can be less nuanced. For a fun twist, you can also experiment with other extracts like almond or peppermint for different flavor profiles.
Essential Equipment: Beyond your ingredients, a few key pieces of equipment will set you up for success. You'll need a heatproof bowl (preferably metal or glass) that fits snugly over a saucepan to create a double boiler setup. An electric mixer – either a stand mixer with a whisk attachment or a powerful hand mixer – is crucial for whipping the meringue to stiff peaks. A rubber spatula for scraping and a kitchen torch for optional toasting are also handy.
Step-by-Step Guide to Perfect Stiff Peaks
Achieving those magnificent stiff peaks is the core of this marshmallow frosting recipe. Follow these steps meticulously, and you'll be rewarded with a frosting that's as beautiful as it is delicious.
1.
Prepare Your Double Boiler: Fill a medium saucepan with about an inch or two of water. Bring the water to a gentle simmer over medium heat. Place your heatproof bowl over the saucepan, ensuring the bottom of the bowl does not touch the simmering water. The steam, not direct heat, will gently cook your egg white mixture.
2.
Combine and Gently Heat: Add the egg whites, granulated sugar, and cream of tartar to the heatproof bowl. Whisk constantly with a balloon whisk over the simmering water. Continue whisking for 5-7 minutes, or until the sugar has completely dissolved and the mixture is warm to the touch (ideally reaching 160°F or 71°C on an instant-read thermometer). To check for dissolved sugar without a thermometer, rub a small amount of the mixture between your thumb and forefinger – if it feels perfectly smooth with no grittiness, it's ready. This crucial step not only dissolves the sugar but also pasteurizes the egg whites, making the frosting safe and stable.
3.
Whip to Stiff Peaks: Carefully remove the bowl from the double boiler and immediately transfer the hot egg white mixture to the bowl of your stand mixer (or use a large, clean mixing bowl with a hand mixer). Begin whipping on low speed for about a minute, then gradually increase the speed to high. Continue beating vigorously. This is where the magic happens! The mixture will transform from a clear liquid into a thick, glossy, white meringue.
*
Watch for Stages: While it typically takes about 7-10 minutes, always rely on visual cues rather than a strict timer.
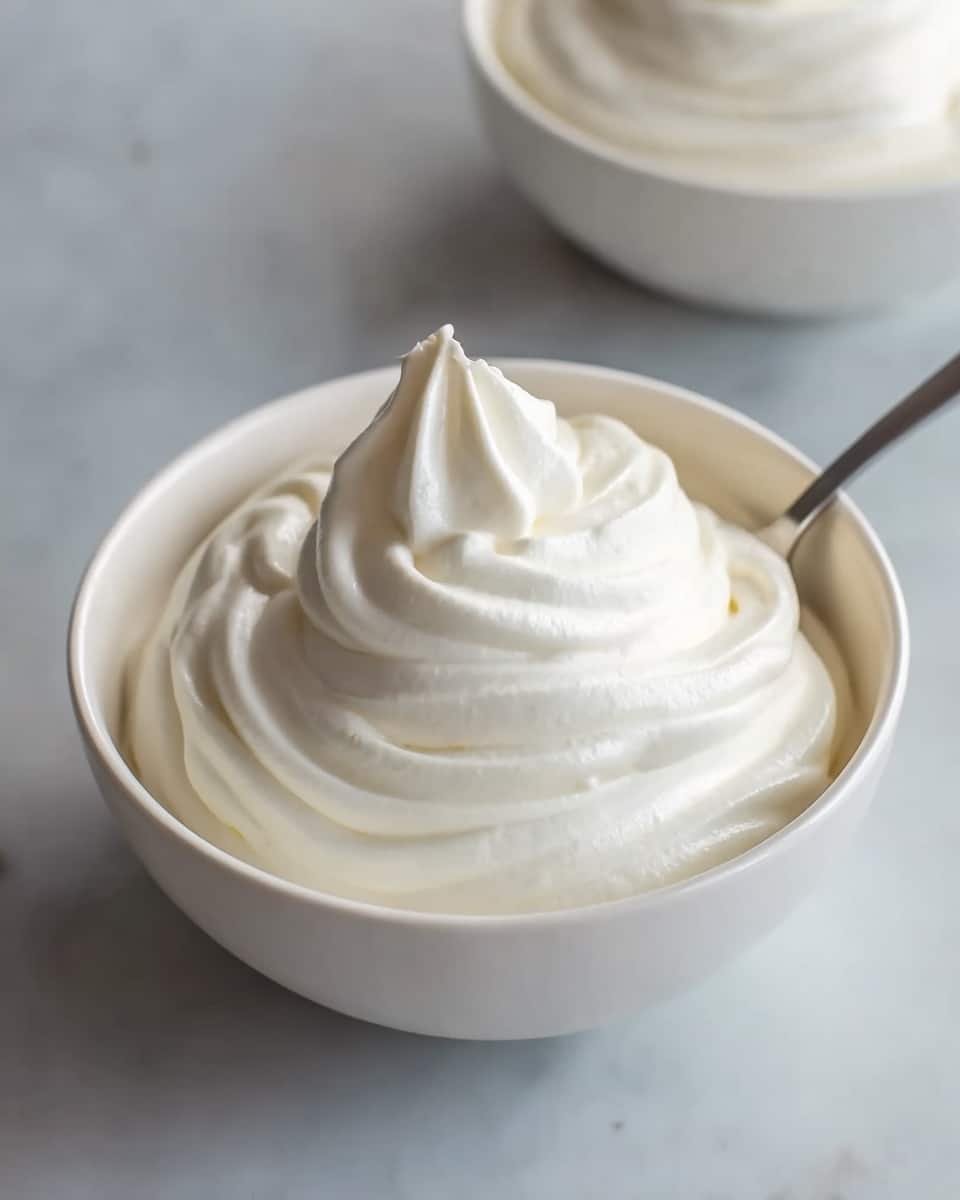
* **Soft Peaks:** At first, the meringue will appear like loose, soft whipped cream. When you lift the whisk, the peak on the tip will fold back into itself almost immediately and collapse.
* **Stiff Peaks:** You've reached the stiff peak stage when the meringue is incredibly thick, glossy, and holds its shape perfectly. When you remove the whisk, the peak will stand straight up without curling or collapsing, maintaining its integrity. The frosting should look absolutely stunning, ready to adorn your creations.
Once you've achieved these glorious stiff peaks, your marshmallow frosting is ready to use! For more detailed instructions on creating a perfectly
Easy Glossy Marshmallow Frosting for Dramatic Cakes, refer to our dedicated guide.
Mastering the Finish: Piping, Toasting, and Storage
With your marshmallow frosting whipped to perfection, the creative possibilities are endless. Its robust structure means it's incredibly versatile for decorating.
*
Piping and Spreading: This frosting is excellent for piping. Load it into a piping bag fitted with your favorite tip to create elegant swirls, rosettes, or intricate designs on cupcakes. For cakes and pies, simply use an offset spatula to create dramatic, airy swoops and peaks that add incredible visual appeal. The glossy finish will catch the light beautifully, making your desserts truly stand out.
*
The Toasted Marshmallow Effect: For an extra layer of flavor and a touch of showmanship, grab a kitchen torch! Once your frosting is piped or spread onto your baked goods, gently brulée, or caramelize, the surface. Start with the torch several inches away from the frosting, moving it constantly and gradually adding more heat until you achieve your desired golden-brown char. This creates a delightful toasted marshmallow taste and aroma, mimicking a campfire treat. Discover more tips for a
Toasted Marshmallow Frosting: Elevate Your Desserts.
*
Storage Recommendations: Marshmallow frosting is truly at its best when enjoyed on the day it's made, showcasing its peak fluffiness and gloss. Baked goods topped with this delightful frosting can be safely stored at room temperature for up to 6 hours. For longer storage, refrigerate frosted items in an airtight container for up to 2 days. Similarly, any leftover frosting can be stored in an airtight container in the refrigerator for up to 2 days. It's important to note that we do not recommend freezing marshmallow frosting, as it tends to lose its beautiful texture and stability upon thawing.
This homemade marshmallow frosting recipe is a delightful departure from traditional frostings, offering a unique combination of lightness, gloss, and stability. By understanding the Swiss meringue technique and paying attention to key details like achieving those stiff peaks, you can consistently create a show-stopping topping that will impress everyone. So, gather your ingredients, fire up your mixer, and prepare to add this easy, eye-catching, and incredibly delicious frosting to your baking repertoire.